The Virtual Pinball Machine
Component Details
What you'll need to build a virtual pinball machine depends on how elaborate you want your machine to be. Some people build small, table-top cabinets with two monitors, while others build full-sized, wide-body pinball cabinets with two large LCD monitors and a real pinball DMD (dot matrix display), shaker motors, pinball solenoids (for sound and tactile sensation), and so on.
My goal was somewhere in between. I wanted a full standard-sized cabinet with three monitors (one for the playfield, one for the backglass, and one for the DMD). The only non-essential item I wanted on the cabinet was a digital plunger (rather than just using a launch button, which is an option). More on that, later. At any rate, these are the components I used on my cabinet. Your needs might vary depending on what you want.
Cabinet
Some people build their own cabinets. The primary advantage to building the cabinet yourself is that you can design it to fit any size monitor you want. Problem is, I'm not all that good at building things. Plus, the cost of the materials generally exceeds (sometimes by quite a bit) what you would pay for an empty cabinet or a dead pinball machine (it would be oh so very wrong to sacrifice a LIVE one) at an auction.
I got mine at the October 13, 2012 auction in Winston-Salem, NC. There were a few dead 80s machines that were good candidates but, even non-working, they were going for $200 or more. I set an upper limit of $100 for my cabinet.
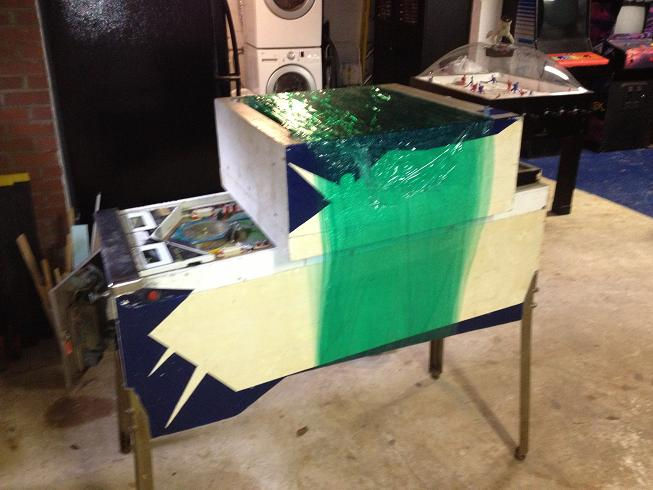
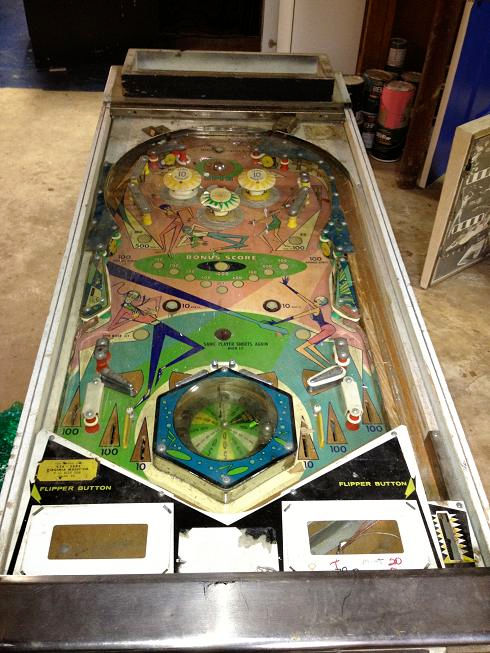
The last machine they auctioned was a totally trashed 1966 electro-mechanical (EM) machine called A Go-Go. I actually looked at this one first and thought it was a piece of junk. It


was missing its glass and side rails, and the left lower corner of the back box was either rotted away or smashed. When it came to the end, however, I decided to bid on it. I got it for $20--$80 under budget!
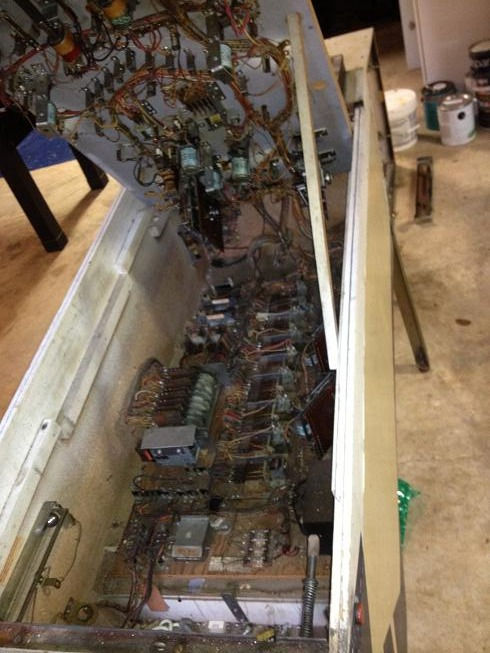
As it turned out, the cabinet was actually really solid (other than the back box damage), with few dings and no major issues (other than being filthy). An added bonus is that the frame around the front of the back box is hinged so that it swings open. This isn't common in old EM machines--you usually have access only from the back.
Plus, the machine met my main criteria--it did not work. When it was plugged in, about 8 bulbs lit up. Someone with a lot of pinball knowledge might have been able to restore it and make it work, but not me. No living pinball machines were sacrificed for this project!
Monitors
As mentioned above, I needed three. Obviously, we're talking about flat-panel LCD or LED monitors. (Don't use plasma screens--they have serious issues with image burn-in and they are generally less reliable.)
General monitor buying tips:
-
MEASURE YOUR CABINET BEFORE YOU BUY YOUR MONITORS! Not all cabinets are exactly the same, especially when it comes to the back box. Make sure the monitor will fit before you buy it.
-
Look for monitors that either can be left switched on (like most computer monitors) or ones that turn on automatically when they detect a video signal. There is an easy and cheap solution for turning everything on with a single switch--but only if all the monitors either remain on or switch from standby to on when they detect a signal (See Wiring.)
-
Make sure that the monitors you use in your backbox are wall-mountable. You can probably rig something to hold a non-wall-mountable monitor--but it's a lot easier if you can just buy a low-profile wall mount and hang the monitor as you would when hanging it on a wall.
-
Check the input types on the monitors you buy and make sure they match up with your computer or that you have cables that will make them match up. My playfield monitor runs on a HDMI cable; the backglass runs on a DVI-HDMI cable; and the DMD monitor runs on a standard SVGA cable.
Playfield Monitor
This is the biggest of the three, and you want to go as big as you can afford so it is as close to the size of a real pinball playfield. This one needs to be capable of 1080p resolution. A standard-sized (non-wide-body) pinball machine can accommodate up to a 37" monitor, as long as you remove the case (the plastic housing).
I went with the RCA 37LA45RQ television. I purchased it on eBay. You can get scratch and dent televisions and monitors on eBay for very reasonable prices. Some have screen damage (look at all the pictures and read the descriptions!), but most just have cracked housings, are missing stands, and so on. This doesn't matter--you're most likely going to remove the case anyway and, if you're like me, the idea of doing that to a brand-new TV is a little troubling. I got my TV for $159 plus shipping (and another $18 got me a year warranty on the thing; which is why I kept the casing--in case I need to put it together again for service).
The only thing I regret about this TV is that it doesn't auto-detect a video signal and switch itself on from standby mode. This means that, although everything else switches on with a touch of a single button (see Wiring), I have to turn this monitor on separately.
Backglass Monitor
The second-largest monitor. This one only has to be capable of 720p resolution, so (technically) it should be cheaper. I set out to find the biggest monitor I could fit into the backbox without having to uncase it. I figured that I'd have to figure out a way to frame the thing if it didn't fill all available space, and that the black case would look as good as anything trim-wise. Based on my measurements and the measurements of TVs and monitors that I looked at, I figured I'd be able to fit a 23-26" LCD monitor or TV.
Then, as fortune would have it, I was in Sam's Club looking at the marked-down, open-box TVs and saw a Hitachi LE29H306 29" 720p TV. I checked the measurements of the TV and it was just the right size to fit in the backbox. This is due to the fact that LED TVs have much narrower cases. They're also a lot lighter and thinner than their LCD counterparts, which I knew would come in handy. (See Cabinet (Part 2).) They're more expensive, though (or, at least, they were in 2012--TVs are way cheaper now). Because this one was open-box and had blown speakers (which I didn't care about), I got it for $191. (The retail is $238.)
I could have saved money by going with a smaller LCD, but I don't regret the extra expenditure one bit. It was almost as if this TV was made to be mounted in a pinball machine. It looks absolutely awesome. For my cabinet, there simply couldn't be a better backglass monitor. Period.
DMD Monitor
The DMD monitor is the smallest and cheapest monitor of the lot. Almost any flat screen monitor will do. I was originally planning on using a 19" monitor that I already had but, in the end, I opted for a 15" monitor I got on eBay (for $6...small monitors are dirt cheap). Ideally, this monitor should be as thin as possible, and it should, like the backglass monitor, be wall-mountable.be
PC
This will probably be be your biggest expense--it definitely was in my case. The reason for this is that the pinball software needs a lot of horsepower to run it You don't want to skimp on the processor, video card, RAM, or hard drive speed--get the best you can afford. It was hard for me to find definitive minimum specs for running the software, so I went with something pretty top-end. I decided to order the parts from Newegg and build the PC myself. (Out-of-the-box PCs tend to skimp on one or more components or have a lot of features you don't need.)
2020 note: system was built to run older versions of all of the pinball software on a (much) older version of Windows. Check the system requirements for the newer pinball software before shopping for your system.
Details of my system:
-
CPU: AMD A8-5600K 3.6 GHZ Quad-Core. I went with this for two reasons: it is cheaper than an equivalent Intel processor, and it has an on-chip graphics processor processor that is the equivalent of a Radeon 7560 video card. (I'm running the backglass and DMD off of the motherboard video outputs.)
-
Motherboard: Gigabyte GA-F2A75M-D3H. A friend recommended it. It's got lots of video outputs and the brand is supposedly reliable. (I'm a Mac guy, so I took his advice.)
-
Memory: 8 GB of Kingston 1600MHz DDR3 memory
-
Storage: 500GB Western Digital 7200RPM SATA Hard Drive (With prices what they are now, you should go with an SSD)
-
Graphics: GeFORCE 6500 Video Card. Although I am running my backglass and DMD monitors off of the motherboard video, I wanted a beefy graphics card to run the playfield. This is the video card that Virtuapin uses in their commercially-sold cabinets.
-
Optical Drive: Samsung DVD ROM/Burner, strictly for installing Windows. I will probably never use it again.
-
Diablotek 775-Watt Power Supply: Don't skimp on the power supply--you need that power not only for the computer but for lights, fans, and so on.
-
Cheap Computer Case: You don't necessarily need one, but I found it easier to keep things organized and stable in a mini-tower case. You can also easily remove the computer for service if it's cased. Plus, in my case (nyuk), there are a couple of pre-installed fans that provide additional airflow and cooling. It's $30 well-spent.
I also got myself a small, wireless keyboard, a wireless mouse, and a USB hub, which I mounted in an accessible location just inside the coin door. Wireless is the way to go--it's hard to get to the back of the PC to plug in a keyboard once it's installed in the cabinet.
Speakers
This was an easy one. Years ago, when I worked at MicroProse, we used to trade games to people at hardware and software companies for other cool things. So, for over 10 years, there has been a nice Cambridge Soundworks computer audio system with a sub woofer and cube speakers sitting in my attic. This was the perfect time to put it to use.
Buttons and Such
There are a bunch of buttons and other accessories you need to make your cabinet work.
Buttons
The number of buttons you need can vary greatly depending on what you want your cabinet to do. My best advice is to plan first (based on your cabinet--you really DO need to get that first) and then buy accordingly. I only needed 9.
There are button packages available from sites like virtuapin.net, but make sure you really need that many buttons. I bought a lot more than I needed. (Not that I won't use them at some point...)
Digital Plunger/Motion Detector/Interface Board
As soon as I found out about this, it was a must-have. At the time, a company called NanoTech Gaming Labs made a digital plunger--a real pinball ball-shooter with sensors that detect how far it is pulled back and the force it should impart to the ball. It's really cool.
What's even better, they also made a board called the Mot-Ion adapter. This board acts as an interface for your pinball buttons (THERE IS NO NEED TO BUY ANY OTHER INTERFACE BOARD--THIS IS SOMETHING THAT I HAD NO IDEA ABOUT UNTIL I GOT THE THING). It also has an accelerometer that detects tilt and shake to add even more authenticity to the games.
The two items could be purchased separately, but I bought them packaged together for $139.00 (a $30 savings). This package includes wired connectors--no need to build your own. (You'll still need ground wire and connectors.)
It doesn't look like NanoTech sells them anymore, but the Digital Plunger Kit v3 from Virtuapin is an updated version of the same thing. It actually looks nicer than mine.
Wiring and Other Accessories
There are a few additional electrical items that you'll need:
-
Cooling Fans: LCD TVs and computers generate decent amount of heat, so the cabinet really needs to be ventilated. I bought 4 120mm computer cooling fans from Newegg along with my computer.
-
Wire: The Mot-Ion adapter comes with wiring harnesses, but you'll still need some wire for the ground connections and for wiring lighted buttons (if you have them).
-
Quick Disconnects: You CAN solder all of your button connections, but that's time-consuming and it makes it difficult to disconnect buttons should you ever need to do so. You can get crimp-on quick disconnects from most game room suppliers online. You'll need both 1/4" (6.3mm) (for the button lighting if you opt for lighted buttons) and 3/16" (4.8mm) (for the actual button connections). You can also buy wiring with pre-attached quick disconnects at Ultimarc. (Crimping's a pain in the ass.)
-
4-Pin Molex Connector (at least one): If you have lighted buttons, you need to tap into the computer's power supply to power them. I used an open 4-pin connector as a power source. I bought a cheap hard drive splitter cable at Radio Shack (remember that place?) and used it's pre-wired connectors (to avoid more crimping).
Construction/Cosmetic Materials
This is a category that can be really minimal or pretty beefy cost-wise. If you're building the cabinet, this is probably one of your biggest expenses. Otherwise, you probably won't need a lot. Here's what I used for my project:
-
Speaker Panel: This is the panel where the speakers are mounted and the DMD display shows through. If you buy a cabinet that was a DMD pinball machine (early 90s and onward), you've probably already got one. If not, you'll need one. Skilled woodworkers can make their own, but I'm not one of those. So, I sprung for the $32.75 it cost to buy a Stern speaker panel from Pinball Life.
-
Rails and Glass: The cabinet I bought was missing its glass and the metal rails and plastic track that hold the glass in place. I got everything I needed from a local repair guy that I know for $30.
-
Paint: My cabinet was ugly, so I bought a gallon of black semi-gloss paint to cover it up.
-
Wood Filler: You'll need at least a little to fill in nicks and gouges. I needed a lot--there was some major wood repair to be done.
-
Wood: Even if you buy your cabinet, you'll need some wood to mount the monitors and so on. I had enough scrap wood from previous projects to do what I needed to do apart from the back door.
-
Brackets and Screws: You're bound to need some small L-brackets and wood screws.
-
Trim Materials: Even though everything in the backbox of my machine fit really well, there were still some gaps that let you see around the monitors. Also, a 37" screen leaves about an 8" gap between the lock down bar and the edge of the screen. My solutions: garage door weather-stripping and black foam board (respectively).